AMP HTMLでフォームを実装する
UI開発者 木村AMP発表当初はニュースやブログなどの記事ページでの対応が推奨されており、form要素やinput要素などフォームに関連する要素を使用するとAMP HTMLの制約違反となっていました。現在ではAMP HTMLの開発が進みフォームを実装するためのamp-formというコンポーネントや、インタラクティブな機能を実装するためのamp-bindが一般に公開され、AMP対応可能なWebサイトの幅が広がりました。
今回はAMP HTMLでフォームを実装する方法をご紹介します。
AMP HTMLでフォームを実装するためにはamp-formというコンポーネントを使用します。amp-formを使用することでフォーム関連のHTML要素が使用可能になり、執筆時点では次のHTML要素が使用可能になります。
- form要素
- input要素(type属性値がbutton、file、image、passwordは使用不可)
- textarea要素
- select要素
- option要素
- fieldset要素
- label要素
通常のHTMLとの主な違い
form要素にtarget属性が必須
form要素にtarget属性が必須となります。target属性はフォーム送信時に送信先のページをブラウザの同一のタブで表示するか、新規のタブで表示するかを指定します。同一のタブの場合は_top、新規のタブの場合は_blankを指定します。
form要素のイベント
form要素にon属性を用いてイベントを付与することが可能です。設定できるイベントはsubmit、submit-success、submit-errorの3つで、送信時や送信結果に応じてモーダルの出し分けなど異なる処理を行うことが可能です。
また、form要素内のHTML要素にsubmit-success、submit-errorの属性を付与すると、初期状態が非表示になり送信結果に応じてその要素を表示させることも可能です。
action-xhr属性
通常のHTMLではフォームの送信先をaction属性を用いて指定しますが、amp-formでPOST送信を行う場合は、action属性の代わりにaction-xhr属性を使用する必要があります。
action-xhr属性はaction属性と異なり、送信時にAMP JS内でFetch APIやXMLHttpRequest APIを用いてPOST送信が行われます。そのため、デフォルトでは送信後にそのページには遷移しません。送信後にページ遷移させるには送信先のHTTPヘッダにAMP-Redirect-Toを設定してリダイレクトさせる必要があります。
POST送信の場合は送信先にHTTPヘッダを設定する
amp-formでPOST送信を行う場合、送信先のHTTPヘッダにAMP-Access-Control-Allow-Source-Originを追加する必要があります。AMP-Access-Control-Allow-Source-Originには送信元のドメインを指定します。
その他にもamp-formで使用可能な機能や、固有のHTTPヘッダなどありますが機能が豊富なため今回は割愛します。
実装サンプル
今回は、amp-mustacheというコンポーネントを併用し、送信結果をページ内に表示します。amp-mustacheはmustache.jsを元にAMP用のコンポ―ネントとして実装されたテンプレートエンジンです。
次が実際にフォームを実装したHTMLのサンプルソースです。
<!DOCTYPE html>
<html lang="ja" amp>
<head>
<meta charset="utf-8">
<link rel="canonical" href="./">
<meta name="viewport" content="width=device-width,initial-scale=1.0,minimum-scale=1.0">
<title>amp-form sample</title>
<style amp-custom>
*{padding:0;margin:0;box-sizing:border-box}main{padding:16px}fieldset{padding:0;border:0;margin:0 0 16px}.btn-submit,.input-text>input{display:block;border:1px solid #999}.input-text{margin:0 0 8px;display:block}.input-text>span{display:block;margin:0 0 4px}.input-text>input{width:100%;height:32px;padding:4px}.btn-submit{width:120px;background:#fff;font-size:16px;min-height:32px;margin:24px 0 18px}.result{color:green}
</style>
<style amp-boilerplate>body{-webkit-animation:-amp-start 8s steps(1,end) 0s 1 normal both;-moz-animation:-amp-start 8s steps(1,end) 0s 1 normal both;-ms-animation:-amp-start 8s steps(1,end) 0s 1 normal both;animation:-amp-start 8s steps(1,end) 0s 1 normal both}@-webkit-keyframes -amp-start{from{visibility:hidden}to{visibility:visible}}@-moz-keyframes -amp-start{from{visibility:hidden}to{visibility:visible}}@-ms-keyframes -amp-start{from{visibility:hidden}to{visibility:visible}}@-o-keyframes -amp-start{from{visibility:hidden}to{visibility:visible}}@keyframes -amp-start{from{visibility:hidden}to{visibility:visible}}</style><noscript><style amp-boilerplate>body{-webkit-animation:none;-moz-animation:none;-ms-animation:none;animation:none}</style></noscript>
<script async src="https://cdn.ampproject.org/v0.js"></script>
<script async custom-element="amp-form" src="https://cdn.ampproject.org/v0/amp-form-0.1.js"></script>
<script async custom-template="amp-mustache" src="https://cdn.ampproject.org/v0/amp-mustache-0.1.js"></script>
</head>
<body>
<main>
<form method="post" target="_top" action-xhr="confirm.php">
<fieldset>
<label class="input-text">
<span>お名前</span>
<input type="text" name="name">
</label>

<label class="input-text">
<span>メールアドレス</span>
<input type="email" name="email">
</label>

<button type="submit" class="btn-submit">確認</button>
</fieldset>

<div submit-success class="result">
<template type="amp-mustache">
<p>お名前: {{name}}</p>
<p>メールアドレス: {{email}}</p>
</template>
</div>

<div submit-error class="result">
<template type="amp-mustache">
<p>送信に失敗しました</p>
</template>
</div>
</form>
</main>
</body>
</html>
また、POST送信の際に送信先にHTTPヘッダが必要なことと、action-xhr属性はJSON形式でのレスポンスを受け取る必要があるので、confirm.phpに次のようなPHPソースを記述し、簡易的にフォームで送信した内容をそのままJSON形式に変換して出力します。
<?php
header('AMP-Access-Control-Allow-Source-Origin: https://example.com');

echo json_encode($_POST, true);
?>
AMP-Access-Control-Allow-Source-Originの値は、送信元のドメインを記述します。
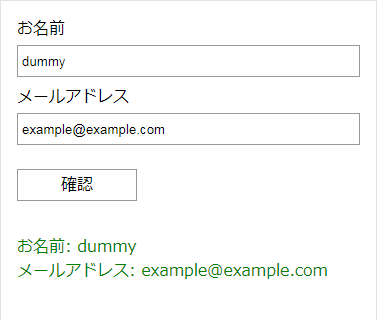
実際に送信した結果が次のキャプチャです。

POST送信が成功したのでdiv[submit-success]要素が表示され、その中のtemplate[type="amp-mustache"]にフォームで送信した内容をテンプレート出力できています。
form要素が使用可能になったことで登録系のフォームやECサイトなどもAMP対応が可能になりました。その他のジャンルのページやサービスでも、アイデア次第でAMP対応が可能だと思われますので是非ご検討ください。また、個人的にこれからもAMPの活用の幅が広がることを期待しています。
